How do I access the PanelPilotACE University?
What connectors do I need for my PanelPilotACE?
How do I use RS232 in the design studio?
Within the hardware element you must specify standard RS232 properties (baud rate etc.). You must also specify the service type; native if you wish to communicate with another PPA device, Terminal otherwise. The “Terminal Mode” property specifies whether the data should be wrapped with a prompt (easy to use within a terminal) or should be raw (device to device). Then you will need to specify send/receive terminators and separators. The terminator signifies the end of a given RS232 command and the separator is the character used to separate multiple values.
The RS-232 Send element allows you to specify a serial port (the hardware element) and then numerous “Send Values”, this element can be called much like any other action and when it is it will send each value (enclosed within specified pre and post messages) separated via the “Send Separator” specified in the hardware element and ended with the “Send Terminator” specified in the hardware element. The values will be sent in sequential order from top to bottom.
The RS-232 Receive element allows you to specify a serial port (the hardware element), when this has been selected you will be able to specify an “Alias”. In order for an RS-232 Receive to be used it must have a unique identifiable command at the beginning, if no alias is specified then the name of the RS-232 Receive element will be used as the command; if an alias is specified then the Alias will be used as the command. A Receive Separator should follow this and then all values you wish for the device to receive also separated by the Receive Separator and then finished with the Receive Terminator. Then you will specify a list of receive properties/variables, this is where the values will be stored again sequentially from top to bottom as first received to last received.
For example if the Alias was set to “rx”, separator set to comma and terminator set to [CR][LF] and the specified receive value was a text boxes Text property then the following would set the text boxes text value to “Test”:
RS-232 Receive also gives you the option to perform an action once the receive has been completed so you could store a value as a variable and then call an action to display it or modify it with a maths builder before displaying it.
N.B. we are in the process of creating further tutorial videos to aid in development with new features.
How do I upgrade my device so that it can operate with the new version of the design studio?
Is it possible to output 4-20mA from a PanelPilotACE display?
I want to implement a spinner that will let me set a variable but I can’t find a way to increment the variable. How do I do it?
How many copies of the Windows software can I install?
Why is the I²C and SPI capabilities of the hardware not available in the software?
Why does the PanelPilotACE software not discover my device on Windows 8?
My clock is set to the wrong time, how do I set the clock?
Where is the mounting bracket shown in the data sheet?
Is there a quick way of testing my projects without having to wire to the SGD 43-A?
I noticed that your device supported GIF images, does it also support animated GIF’s?
I am looking for a configuration that is not listed in the PanelPilot software. Can you make one for me?
My graphics aren’t appearing in exactly the same place on the display as they are on the emulator. Why is this happening?
I see that there is an add-on board for RS485 on SGD 43-A but not the SGD 70-A, why is there no board for the 70?
What protocols are supported over RS485?
What do the jumpers do on the RS485 add-on board?
PL2 is used to connect or disconnect the terminating resistor from the circuit.
How do I configure RS485 within the design studio?
Go to your project settings (select your project and look at the properties editor). Towards the bottom of these settings you should see “Enable RS485”, by enabling this property you will see that PWM1 and PWM2 are disabled for the RS485 and that there is a drop down to select the third pin that will be disabled. Select either Digital Channel 8 or PWM Output 3 and ensure the corresponding jumper position is selected on the board. Now you are ready to use RS485 in the same way as you use RS232 (but with an RS485 COM PORT instead).
SGD 70-A
The SGD 70-A has dedicated pins for RS485 and therefore no project configuration (or add-on board) are required. Simply use it in the same way as you used RS232 (but with an RS485 COM PORT instead).
Do PanelPilotACE displays support the CAN bus protocol?
Which protocols related to CAN bus does the S70-CAN board support?
How many CAN channels does the S70-CAN CAN bus board provide?
How do I allocate a MAC address for a PanelPilotACE?
2. Ensure the PanelPilotACE device has the supporting Ethernet hardware. This is included with an SGD 70-A model, but will require an Add-on board for the SGD 43-A.
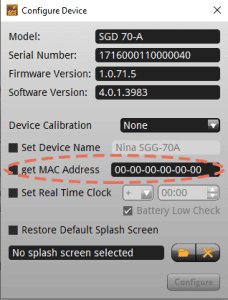
3. Connect the PanelPilotACE device to the PC via a USB cable. Once successfully connected, the device will be visible in the Device Settings menu for the PanelPilotACE. This is located in the top-right hand corner of the Design Studio workspace. Click on the burger menu button on the far right to view the drop-down menu. Select Device Configuration from this menu to access the MAC address settings. If a MAC address has already been configured for the device it will be displayed in the Get MAC Address field. If not, this field will display 00-00-00-00-00-00 or be blank (see image below).

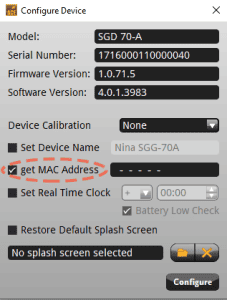
4. If you want to allocate a MAC address, check the box next to Get MAC Address (see example below).

A MAC address will then be requested from the PanelPilot Server. The MAC Address field will then populate with a MAC address (see image below). Note: this may take up to a few minutes.

5. Click on Configure. The Device Configuration menu will close and the PanelPilotACE device will reboot.
6. Go back to the Device Settings burger menu and select Hardware Information. The MAC address will be displayed in the Physical Address text box (see image below).


